The concept of 3D printing is so popular right now that it might almost be a buzz word. Want something that is not available in stores? Just 3D print it! The truth is quite a bit more complicated, as we have learned over years of experience. The process and the people making it happen are vital to the result. Virtually anyone with some extra money can buy a 3D printer. It is the mixture of design skill, technical understanding and attentive customer service that helps us ensure the perfect 3D printed custom urn every time.
Why Is the Urn-Making Process So Important?
Every 3D printed urn we make is totally original in some way, but we have tailored our approach to an art form, so that we can make our high standards easy to repeat. The predictability of our processes is what allows us to offer reasonable certainty that we can pull an urn idea right out of someone’s head and make it real. We were delighted to be one of the first to introduce this amazing technology into the industry of custom cremation urns. Now, we take pride in the fact that every step is carefully distilled to give our customers exactly what they want.
Step 1: Brainstorm Design Ideas
If some of the ideas that we come up with for custom urns seem a little far-reaching, it is because we recognize very few limits. We love it when people encourage us to think outside the box. This step of the 3D printing process can occasionally feel like history in the making. We have made a countless number of urns, some of which are quite unexpected. Many of our most popular designs start right here, with a customer’s initial request. At first, our clients talk to our lead designer about an urn concept they would like to see. Sometimes, people shop our existing product lines and feel that they want something unique. We get a sense for the design, talk over size limitations, and request more information as needed. This is the best time to discuss customization, such as: • color- full color, white or bronze • size- the dimensions of the urn, as well as its capacity to hold cremated remains • material- commonly gypsum stone, but could also be made out of wood, plastic or metal casted Our skill with 3D printing technology gives us such flexibility that we can make almost anything. Although many of our 3D printed urns feature a bronze finish, we could also have one made entirely out of bronze. Despite the complicated design and materials, the cost of the result might not be any more than an expensive casket. Our goal is ultimate customization, so we encourage everyone with a great idea to call us and request a quote.
Step 2: Build a 3D Model
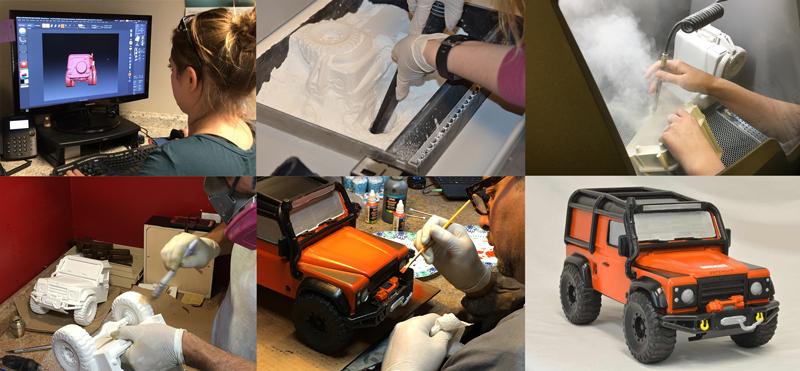
Like a regular printer, a 3D printer is usually only as good as the image sent to it. This step is where some real magic happens in the 3D urn process. Creating a 3D model is a lot harder than it sounds, and requires a computer with massive power. Our modeling artist uses a system with a water-cooled CPU to effectively sculpt the design. Every aspect must be just right, in proportion, size and detail. With a 3D image, the walls must also have the right thickness for practical use and durability.
Getting it as close as possible in the original design can be a bit difficult, especially since our 3D artist is often building models out of people’s memories or dreams. Pictures help a great deal, and images from a variety of angles provide us with the most information. If we are creating a replica of an existing item, we sometimes use 3D scanning technology to take many images of the object from every perspective. A 3D scanner may be able to scan small things, people or even cars, depending on its capability. This provides us with the data we need to ensure the model has a high degree of accuracy.
Step 3: Verify the Digital Preview
Attending to people’s final rest is a timely business. Sometimes, our customers need an order quickly, putting the modeling artist on a strict deadline. Yet, we know that there is no replacement for genuine accuracy. That is why we send a digital preview to our customers, to confirm that everything looks just as it should. On occasion, we need to shift the model in some form. Perhaps the lines need to be finer, or the proportions slightly adjusted.
This is also a last opportunity to make changes to the post-processing aspects of the 3D printed urn. People who originally wanted an urn in white might decide that they would prefer full color or bronze, once they see the image ready to print. When we built a 3D model for a bronze battle cross memorial for the Naval Base Coronado near San Diego, CA, we later adapted the image for a piece of cremation jewelry. Once the image is ready to go, we can reuse it again and again for a customer’s benefit. We always keep a copy of the digital image, so they can request a new 3D urn at any time. Which is good if down the road they decide they want to order a matching urn for another member of the family. They might also want to get the same urn created at a smaller size for a keepsake.
Step 4: Print the Design
With all the lead-up to the design, it might be easy to believe that 3D printing demands weeks of time. In fact, the urn printing process might only take a day or two, depending on the size of the finished product. Each 3D printer has a build area that limits the size of individual pieces. Many of our 3D urns call for several pieces that we attach securely once the printing is complete. Using the 3D model that has all the right dimensions, the printer starts to build very tiny layers of the chosen material. Like a regular printer would use ink, a 3D printer relies on powdered substances to make the design. The goal is absolute precision, so the printer may take several hours before it is finished. Some of our larger items take longer, dozens of hours on occasion.
Step 5: Finish Processing the 3D Printed Urn
People who imagine a ton of powder flying everywhere might wonder how a 3D printer can even make precision possible. After a few years of making 3D urns on a daily basis, we have also brought our post-processing skills to the next level. Believe us when we say that the result is often so flawless it is shocking to see. For example, the Land Rover 3D urn we recently made for a client reflected the awesome skill of our lead graphic designer, Krystal Cassano. The detail on this replica is something that few words can describe. Some aspects of the final processing are the same for all the urns we make. Each 3D printed urn gets a thorough cleaning to remove any excess powder. This step might take a little longer for designs with a lot of intricate features. After the urn is spotlessly clear, we apply a hardening solution. This layer makes the surface of the urn more durable.
Processing the 3D printed urn may call for added tasks, depending on the design and function of the urn. Several of our 3D urn styles, such as the 3D bust urn, are printed in two pieces. With this particular urn, the ashes are contained in the base, which is also often 3D printed from the same material. Before we can put on the final colors and customization features, we piece the urn together so that it shows its designated shape.
Step 6: Add Color and Personalization
Last, but certainly not least, we add the final touches to the 3D printed urn. Painting an item to look just like the original takes a master. Jared, our painter and detailer, undeniably earns this title with his skill and his work ethic. Jared’s guiding hand has the ability to turn a simple piece of material into a memorial unlike any other. Anyone who has the fortune to glimpse Jared’s handiwork in person, such as the urn we made for Yogi Berra, can easily see how he imbues the piece with his own dedication to perfection. At the end, we also add our customary engraving, which can feature a name, dates or a loving sentiment. We place color inside the engraving, according to customer specifications. As the product is complete, we package it carefully for shipping and send it to the correct address. Anyone who has worked to master a certain skill will indicate that the journey is often the most important part of the conclusion. In short, people who take shortcuts in the creation of a masterpiece may find that the piece is not masterful at all. We understand this truth, and also how much love and grief our customers invest into the products we make each day. That is why we continually work to ensure that every step in our 3D printed urn process guarantees quality from every possible angle.